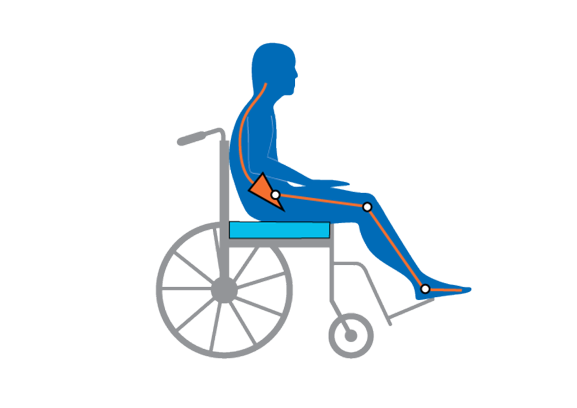
Skin considerations during transfers
Any type of transfer—independent or assisted—can affect skin integrity. Ensuring adequate clearance from obstacles, such as wheels and bed surfaces, helps minimise shear and friction risks.
Mastering independent transfers requires skill, proper technique, and practice. For assisted transfers, it is equally important to train caregivers in safe techniques to protect the person’s skin.
Advanced transfers: risks and considerations
More advanced transfers require specific training and skills to safely manage associated risks. Clinicians should carefully consider the following factors:
- Significant height differences or longer distances to overcome (e.g., car transfers, toilet transfers, floor or couch-to-chair transfers).
- Limited surface area for secure hand placement, such as during toilet or commode transfers.
- Transfers between two mobile surfaces (e.g., wheelchair to shower commode), creating instability; this is high risk and generally not recommended.
Considerations for assisted horizontal transfers
When transferring a person from a horizontal position, the following strategies can help reduce the risk of falls, skin injury, and other complications:
- Position the wheelchair close to the transfer surface to minimise the transfer gap.
- Align the front castors forward, in line with the back wheels and ahead of the stem, to maximise wheelchair stability.
- Use a transfer board strictly as a bridge—not for sliding—to avoid increased shear and friction on the skin.
- Encourage the person to move forward during the transfer to clear the wheel; cover the wheel if needed and position yourself in front of the person when assisting.
- Promote hand placement close to the body’s centre of mass and near the target surface to improve control.
- Ensure weight is transferred forward to facilitate a strong lift and adequate clearance during the transfer.
Hoist considerations
- Clearance from Equipment: The maximum height of the hoist boom and the lowest bed or wheelchair height determine clearance during hoisting. Ensure the person’s head does not contact the boom.
- Mast Clearance: Mast clearance varies by hoist model and individual body habitus. Confirm the person’s feet do not strike the motor or mast during transfers.
- Yoke-style or two-point frame. These frames use slings with loops that can create shear forces on the skin during transfers, particularly as weight shifts during the transition from lying to sitting. The sling may pull or drag against the skin, increasing the risk of shear injury. Careful sling selection and transfer technique are important to minimise this risk.
- Pivot Frame: Pivot frames improve control and positioning, allowing more precise placement of the person rearward and upright in the chair. These slings are hoist-specific and non-interchangeable. Some pivot frames have powered actuators to enable controlled transitions from lying to sitting.
Sling considerations
- Size and fit – Measure from the person’s coccyx to the top of the head, for slings with head support. Centre the sling over the spine. If the person’s body touches or falls outside the binding, change to a larger and wider sling. This will prevent friction and physical skin trauma, as well as minimise the risk of a person falling or rolling out of the side of an undersized sling.
- Style – different styles offer varying levels of skin contact and support. A general purpose sling has greater coverage than a hygiene or toileting sling.
- Fabric – types include mesh, fabric or ‘parachute’ material, and each offer different friction coefficients. Mesh is generally not recommended, due to higher friction.
- Technique – Support the leg when inserting and removing the sling leg straps to prevent shear and friction.
- Repositioning – Never tug or pull on the sling to reposition the person in the chair. Instead, hoist the person up again to optimise the positioning.
- Moisture – Never use a wet sling.
7 steps for safe hoist transfers
Hoisting a person into a wheelchair or shower commode can present many risks for falls and injuries. These 7 steps provide best practice guidance to ensure safe hoist transfers.
Step 1: Hoist transfer into a wheelchair
- Cushion Setup: Before hoisting, ensure the cushion is set up according to the manufacturer’s guidelines and correctly positioned on the wheelchair. Check labels to identify the front and back of the cushion.
- Sling Application: Ensure the person is centred in the sling. Rolling is the preferred manual handling technique for sling application.
- Bed Head Elevation: If possible, once the sling is applied, elevate the head of the bed and then attach the sling to the hoist. This reduces friction during the hoist lifting phase and enhances comfort for the person.
- Body Clearance from Bed: Ensure the hoist user’s body—especially the feet—is clear of the bed before pivoting or moving them off the bed surface. If this cannot be avoided, the hoist operator should assist by gently lifting the feet during the transfer to prevent dragging or shear to the skin.
- Foot Protection: Where possible, have the person wear shoes or protective footwear to reduce the risk of injury from contact with the hoist motor or mast.
Step 2: Check person is rearward in the wheelchair and commode
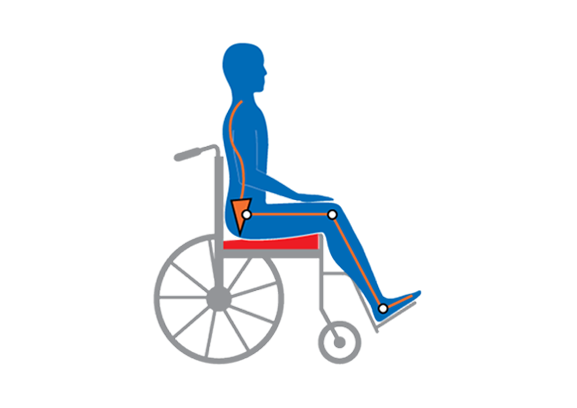
If able, tilt the chair back using the tilt function (e.g. on a tilt-in-space power or manual wheelchair, or shower commode). Gravity helps position the pelvis back into the chair.
As the person is lowered into the chair, push on the knees or use the powered hoist frame (while maintaining the person’s sitting balance) to get them back into the seat.
Check the person’s balance and positioning, once the weight is offloaded from the sling. If the positioning isn’t correct, hoist up again and reposition. Never pull the clothing to reposition in the wheelchair, as this can cause shear, friction, and inappropriate clothing fit.
Check if there is space between the sacrum and the backrest by leaning the person forward in the wheelchair. No gap should be seen or felt. If the person is not far enough back, re-hoist them and ensure you push on the person’s knees as you lower them.
Step 3: Remove the sling
- For safety, always stand in front of the person.
- Once the person is correctly positioned, the sling can be removed. Lean the person forward, to remove the sling, pull down and rearrange any clothing as needed, to decrease wrinkles and creases. If required, a further adjustment can be made by leaning forward in the chair and pushing against the knees to get back into the chair.
- Remove the legs from the sling by lifting one leg at a time.
Step 4: Check pelvis is level
Make sure the pelvis is level in sitting by placing your thumbs on the front of the pelvic bones (anterior superior iliac spine – ASIS) and check:
- The space down each side of the person is even to ensure the person is sitting centered.
- The ASISs are at the same height.
- That the person is not rotated (one hip forward and one backward).
Step 5: Check trunk, head and shoulders are centred and level
- Assistance with this is required only for people who do not have full control of their trunk or have impaired balance.
- If someone is independent with their balance and trunk support, they can check their posture in the mirror and readjust as needed.
- After placing the arms into the arm troughs on the chair, place hands on either side of the rib cage/trunk and reposition as needed by gently pushing on the side to correct.
- The head needs to be centred on the headrest. If the head and shoulders cannot be centred, then re-check the pelvis (ASIS).
Step 6: Check feet and leg positioning
- Make sure the feet are centred and flat on the footplates. If the person is not wearing shoes, make sure there is padding under the feet (e.g. a folded towel).
Step 7: Attach straps and supports
- When all of the steps above are completed, apply straps and supports for safety, as required. A chest strap is highly recommended for someone who has impaired sitting balance. A thigh strap may be used to prevent the legs from rolling out. The need for these should be assessed by a clinician (occupational therapist or physiotherapist).